Business Log
User's Guide
Introduction
BusinessLog is intended primarily for small business owners, rental property owners and self employed individuals who want to keep good records and save time when filing for taxes. It is not intended to replace a tax accountant. Tax accountants know the intricate details of the law and can help you save money and hassle, including the hassle of being audited because you made a mistake in your filing. However, the app is very useful when using an accountant as it will save the accountant much work.It should even save you money as a result. The discount I get each year from my own accountant because I use this app and provide a detailled spreadhseet of my income and expenses is worth many times the price of the app, each year!.
The app is available from the Android Play Store under BusinessLog.
The following is my understanding of the US tax code and should not be construed as tax advice.
The IRS requires that Schedule C (profit or loss from business) and Schedule E (supplemental income and loss, such as rental property, royalties, partnerships etc) be broken down in 5 main categories: Income, Expenses, Cost of Goods, Vehicle Costs and Other Expenses for each independent business you operate. The Expense category is further divided between different types of expense such as telephone and other.
The app has been designed to make it easy to track income and expenses so that they fall in the right category and it will be easy to input your information into the Schedule C/E forms.
While the app is intended primarily to make it easier to file your taxes, it can also be extremely useful for a host of other small business or personal activities, like tracking large purchases and keeping track of warranty information for your purchases, vehicle maintenance records and any other purpose.
The app has been designed to be extremely easy to use and fast. The last thing you want to do is spend more time than you have to for bookkeeping. You do not need to go through multiple layers of menus to do anything. The initial configuration (setting up your businesses and income/expense categories) takes a few minutes and you are ready to roll.
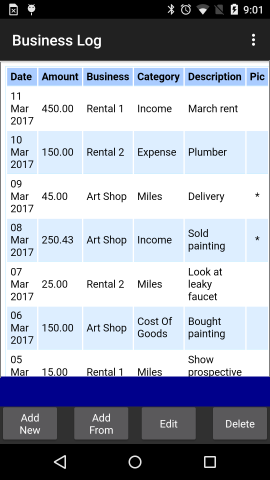
The app opens up on the main database and you can browse existing records, or create new ones immediately:
Warning
The purpose of the app is to store information that may be critical to your business. Your phone or tablet are not perfect and may fail at the most inconvenient time. It is very strongly recommended to ensure the app does what you need and that you frequently export the data using the Export DB menu option. We cannot take responsability if the app or the phone crashes and you lose your data.
Disclaimer
The information provided here is not a substitute for professional advice you would get from a accountant or tax advisor. We cannot assume any liability from anyone filing taxes improperly for any reason related to this app.
The app is provided without any warranty of any kind, express or implied. If you are dissatisfied with the app, your only recourse is to obtain a refund as described below.
Privacy
BusinessLog respects your privacy. It does not collect any information about you. The app does not make or use any internet connection (other than launching the email app on your phone to send your backup, or launching the browser to view this User's Guide).
Your data is saved on the phone itself, which is usually safer than cloud storage but the counterpart is that you need to backup your data regularly. Of course, you are free to use 3rd party apps and export your data to the cloud if you want but this is your choice and it is not required to use the app.
The app itself is not password protected. It is strongly recommended to protect the phone itself by enabling its password protection. If somebody gets ahold of your phone and it is not password protected, you may have many things to worry about, in addition to BusinessLog data.
Cost
Writing and supporting an app takes time and money. There are typically 3 ways an app author can make a business publishing an app:
- Selling the app
- Selling customer information
- Selling ads
Demo/Trial Version
There is a free Demo version on the Play Store that is fully functional but limited to 20 records.
Refunds
If you buy the app to try it and do not like it, it is easy to get a refund (see below).
It is our goal to make sure you are satisfied with the app. If you encounter difficulties, please contact us using the email at the bottom of this guide.
If you are dissatisfied in any way, you can return the app and get a refund using the Play Store:
- Open the Google Play Store app.
- Tap on the Menu icon and choose My Account.
- Select the app you want to return.
- Tap on Refund.
- Follow the on-screen instructions to get your money back and uninstall the app.
Definitions and Features
The following information is only provided as an example. You should always refer to the official Schedules C/E or to your accountant for the exact allocation of your business income and expenses and definitions of terms.
First, some definitions. Here are the five classes of transactions that have to be independently itemized in the Schedules C and E.
- Income is pretty clear, that's any money you collect in the course of operating your business.
- Cost of Goods Sold is the portion of your costs that goes directly into the product you are selling, including direct labor and materials. If you have a service or retail business (like if you make wedding cakes or you are a garage door installer), that is the cost of the materials or the garage door you purchase for your customers. If you pay people to help you make your product, their salary is also included, but any other labor not directly related to working on the product you sell, like the janitor if you have one won't go into this category.
- Expenses are most the other costs. Those that are not going directly into the products you sell, like the ad you place in the local newspaper, your gas and repair bills for your car or truck if they are used for your business. The instructions for Schedules C/E include a list of all expense categories that have to be included in this class.
- Miles You can deduct the actual expenses of operating your car or truck or take the standard mileage rate. If you choose to use the standard mileage, you need to track your mileage separately even though the corresponding expense ends up in the Expense category on your Schedule C/E. It is required to tabulate miles separately and compute the expense using the rate published by the IRS. Check the Schedules C/E instructions as the rate changes periodically.
- Other Expenses This includes other expenses not specifically listed in the Schedule C instructions for the normal Expenses class. That includes your cell phone bill if it is used for business for instance. Telephone bills(including Internet when applicable) may need to be reported separately. Check with your accountant and/or the IRS's own Schedules C/E instructions for details.
If you operate a consulting business, you may also want to track hours spent on given activities or projects for later billing to your customers, independently of the requirements of Schedues C/E. The app therefore also allows you to track hours as a separate category. You can also add your own categories, see further down.
Record Keeping
The app lets you take pictures and associate them with an entry in your log. The main use is for receipts, but you can also use it for other things. You can associate one picture with each record.
Ease of use
Aside from the original setup of your database (setting up businesses and categories) and the occasional export, most daily interactions (creating new records or modifying records) can be performed from the 4 buttons at the bottom of the main page without the need to access the menu.
Main Screen
When the app is started, the main screen displays a table of entries. This is also referred to as the Log view. When you install the app the first time, a demo database is created with a few entries to give you a feel for what it does.
It will be easy to clear them up before you start with your own actual data.
Adding a new record
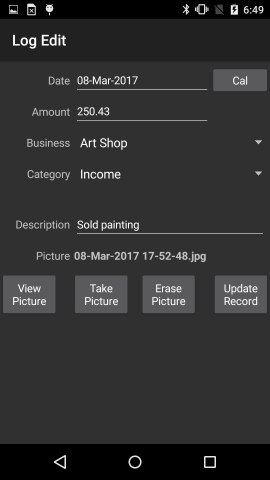
To add an entry, click the "Add New" button. A new page opens up where you can enter various information.
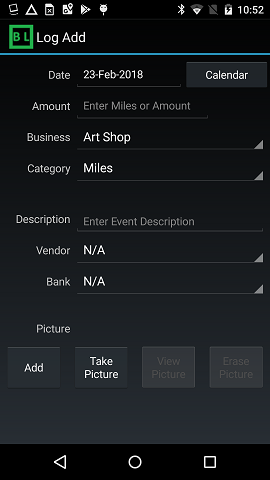
The date of the transaction by default is today's date but you can change it by clicking on the Calendar button.
The app always reorders the transactions by date (most recent at the top), so you do not have to enter them in any particular order.
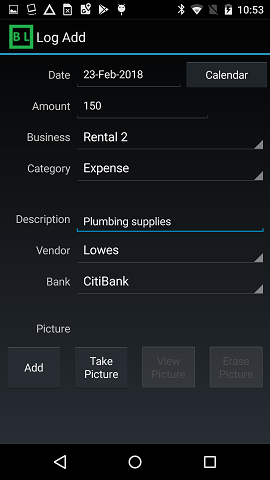
The next entry is the Amount. This is always a number. It could be currency, miles, hours, or any other number of your chosing corresponding to the category for this item.
The next two entries (Business and Category) are selected using the spinners. The choices you have are defined in two other tables which we will review later. This is the information that is necessary to have for your Schedule C, but you are free to add more categories to track other kinds of transactions.
The next piece of information is Description. This is a text field that you can use to enter any additional information you may need about this particular entry.
The next two entries (Vendor and Bank) are also selected using spinners and they have their own tables like Business and Category above.
Finally, you can take a picture of a receipt or any other document you want to associate with a log entry.
When done, click "Add" and you are returned to the main table view with your new entry added.
If you change your mind before saving, simply click the Android Back button and you will be returned to the main table page.
Changing or deleting a record
To change or delete an entry, you have to first select it in the table by simply clicking on it. You need to click on the text part, not on the empty part of a cell.
The record you selected is shown in the blue bar below the main table. You can therefore easily verify you selected the right entry.
Then click on "Edit" or "Delete" according to what you want to do.
The Edit function opens a page similar to the Add page, except that the Add button has been replaced with an Update button.
Please note that there is no Undo. If you change or delete an entry, there is no way to automatically restore it. If you forgot what was the information you erased, your only hope would be if you have a recent backup.
However, deleting a record does not automatically delete a picture that may have been associated with that record.
Adding a new record identical or similar to an existing one
This can be useful for instance if you have multiple rental properties with monthly Homeowner Association Fees. While you may not want to track those as a separate category, each month you have to create one entry for each property with a comment (Description) of "HOA fee" for instance. Once you have created the first entry, simply select it on the main page and click "Add From". The Add page will open up but with the fields already populated with the data from the existing record. Simply change the "Business" to the new property, you may have to change the amount and/or the date if they are different, click Add and you are done.
Businesses
The demo database defines 3 businesses as examples: "Art Shop", "Rental 1" and "Rental 2".
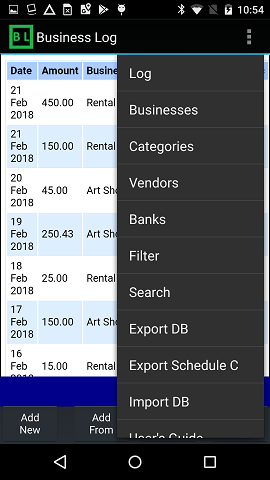
You can see those options by clicking on "Businesses" in the menu.
This action opens a table with the Business entries currently available. Again, these are used for demonstration, replace them as you need.
To make a change or add new choices, use the Add, Edit or Delete buttons as was described for the main table above.
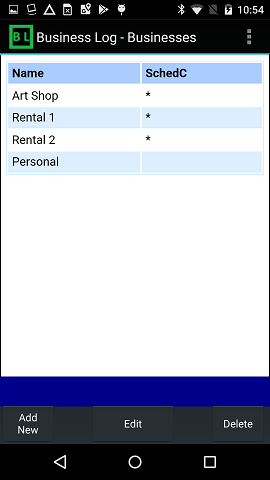
For instance, you can easily add a new business called "Personal" to keep track of your major expenses and warranty information.
Each business is associated with a check boxe called SchedC for Schedule C. If you click the box, the business will be used when generating the Schedule C export report.
If you use Business Log to record personal transactions for record keeping but that will not be used for taxes, simply uncheck that box.
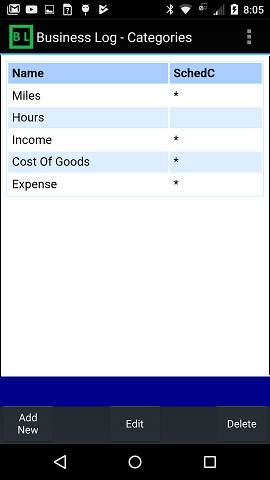
Categories
The Categories table can be accessed from the menu as well by clicking on "Categories".
Note that the categories are shared between all the businesses, even though as we talked about earlier, some categories may not make sense for a particular business.
Categories also have a SchedC option which works similarly to the one in the Businesses table.
Editing Business, Category, Vendors or Banks tables
When you rename or delete an entry in any of these tables, the main database is not affected. The entries referencing the previous name are not modified in any way, so if you rename a Category, you may end up with more unique categories in the main database than there are in the Category table for instance. This is intentional.
However, there is no facility to modify a batch of database entries if you wanted to rename a category across the board for instance.
Also, the first 5 categories cannot be moved or deleted as they are necessary for the Export Schedule C function.
So make sure you carefully name any additional entry in those tables.
Saving Pictures
The app makes it easy to take pictures of receipts or other documents and associate them with a record in the database. Each record can be associated with one picture.
Pictures can be associated when the new entry is created, or added later (using the Edit function).
Pictures taken from this app are not saved in the normal Picture folder (you do not want receipt pictures in the middle of cat or children pictures!) Instead they are saved in the following folder:
Internal storage/BusinessLog
You can view the pictures directly from within the app by launching the default picture viewer, and if your picture viewer supports it, you can share or email them directly from there.
You can also easily access the receipt picture folder by connecting your phone or tablet to a computer via USB, or directly on the phone or tablet itself using a file manager.
Picture names have the same date as the record they are attached to, making it easy to locate a particular document. However, if you later change the date of the transaction, the picture will not be renamed. It will remain linked to that record however.
When a picture is attached to an entry in the log, its file name is displayed and the picture related buttons (View, Erase) are enabled:
Filter
You can set a filter to select the main database records that are displayed at any time. To define a filter, click on the menu and select Filter. By default, all filters are unselected ("no filter"). By selecting a particular Business, Category, Vendor, Bank, or a particular start and/or end date, you can accordingly restrict the records that are displayed. Once you have defined the filter using the Set Filter menu, click on the "Filter ON" button to activate it. To turn it off, open the Filter page and click on "Filter OFF".
Note that the filter affects all functions in the Log menu while it is turned on, including the export function. Therefore, if you have the filter turned on and you export your database, only those records that are displayed will be exported.
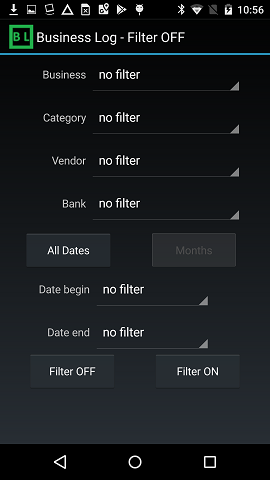
The buttons "All Dates" and "Months" define how the "Date begin" and Date end" spinners are populated. By default, the Date Begin spinner shows the 1st of the month for all the months in the current year (up to the current month) and all 12 months for the previous year. 00:00 AM is assumed. The Date End spinner shows the last day of the month for all the months in the current year and all 12 months for the previous year. 23:59:59 (11:59:59 PM) is assumed.
You achieve this selection by clicking on "Months".
Alternately, by clicking on "All Dates", the spinners are populated by all the record dates in the database. Since there may be a lot of entries, use that selection wisely.
Search
The Search function operates on the Description field. You can search for an entire word or a portion of a word. The search is no case sensitive.
Search can be turned on and off independently of the filter. If both are turned on, both are active at the same time, i.e. the search will operate on the filtered results.
Export DB
This menu option allows you to export the database as a CSV (Comma Separated Value) file or as an Excel spreadsheet via email. Either of these files can be easily imported into any spreadsheet program, including Google Sheets.
The CSV format is particularly useful when backing up the database as this format can be easily imported back into the database on the same or another device.
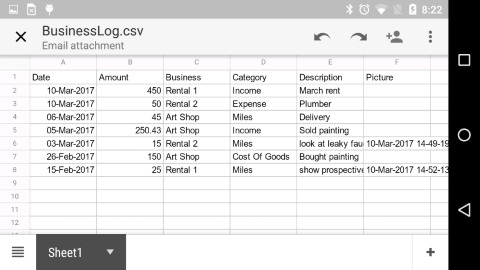
When using this option, the exported data will look just like the main database with the same number of columns.
Be aware that the Export DB function is affected by the Filter and Search settings, so if you want to export the entirety of the database, make sure both the Filter and Search functions are turned off.
The picture below shows the BusinessLog.csv file imported into Google Sheets on a smart phone.
The Excel format is compatible with all Excel versions from 1997 and up.
The Export DB function does not save the Business, Category, Vendor and Bank tables. However, the Inport DB function can recreate those tables (see Import DB below).
Export Schedule C
This option exports the database in a format more readily usable for filing Schedule C. Schedule C can also be exported as a CSV file or Excel spreadsheet.
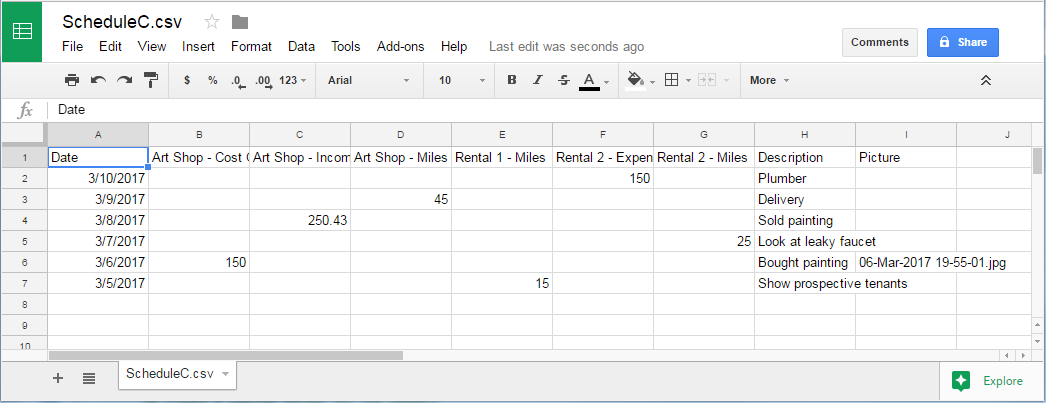
The "Amount", "Business" and "Category" columns are replaced with a series of columns named "Business 1 - Category 1", "Business 1 - Category 2", "Business 1 - Category 3", "Business 2 - Category 1", "Business 2 - Category 2", "Business 2 - Category 3" and so on where each column has only the amounts that belong to that combination of Business and Category. Only the columns where there is actual data are created (there will be no empty columns).
Just like the Export DB function, the Export Schedule C function is affected by the Filter and Search settings, so if you want to export the entirety of the database, make sure these functions are turned off. Of course, for tax purposes, you should select the records for the tax year you are interested in.
When the Excel format is chosen, the spreadsheet includes totals for each column.
The picture below shows the ScheduleC.csv file imported into Google Sheets on a Windows PC.
This picture shows the Schedule C export in Excel format (displayed by Excel 2016).
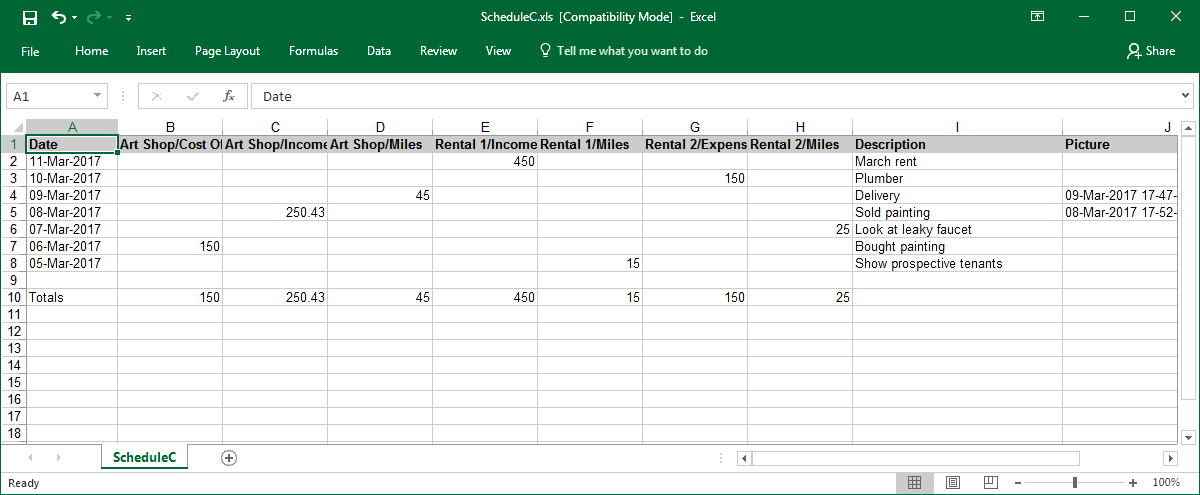
The Excel format is compatible with all Excel versions from 1997 and up. Note than when opening an emailed spreadsheet into Excel the first time, Excel will block the formulas, display a warning and the totals will show "4" instead of the actual values. Simply click on the "Enable Editing" menu in Excel to dismiss the warning and enable the formulas.
Backup and Transfer To A New Phone
To transfer the database to a new phone, you simply need to backup the database in CSV format using the Export DB menu and import it into the new device using the Import DB menu.
Typically, the app will save the file in the Download folder for .CSV files and will offer you to email it.
The location "Download" varies by phone, so you know you have downloaded the file but can't find it with the Import DB function, it may be easier to use an Android File Manager app like "Amaze File Manager" (free, available in the Play Store) to locate the folder.
On the new device, make sure you download the file attached to the email using your mail software, then use the Import DB menu in the app to import the data.
When importing, you will be given the option to first erase the existing log. This is the option to use if you want to discard the existing data in the new device. Use this option if you only have the demo database in the new device.
A confirmation message will make sure you mean this.
Then you will be given the option to also delete the Business, Category, Vendor and Bank tables. If you select yes, the content of the tables will be deleted but new tables will be created from the content of the database you are importing, so the only lost information would be the Businesses, Categories, Vendors or Banks that you have not done business with when using the old phone. You can always add the missing information by hand later if you wish. You can also keep the tables and only new data will be added. Note that the Category table will always contain the default Schedule C categories even if you have not used them.
Note that this transfers your records but not your pictures.
If you want to transfer the pictures as well, you will have to copy them using the information in Saving Pictures.
If you have a lot of pictures, it may be easier to connect the phone to a PC via USB and use the PC to transfer the pictures rather than email.
Tips
Using BusinessLog for personal (not tax related) purpose
One common use is to keep track of important purchases such as househool appliances, tools or yard equipment that may have a warranty. You can take a picture of the receipt and indicate "warranty" in the Description field. If you ever have a problem with that item, just filter the database for "warranty" and all your purchases will show up, making it easy to find the receipt and determine if the item is still under warranty.
You can also use it to record important events and retrieve the exact date by searching the Description field.
Contact and Support
BusinessLog has been extensively tested on a variety of devices and operating systems, with Android versions between 4.1 and 9.0. It is fully expected to work with future versions as well. However, the sheer number of phone models and Android versions, and monthly security upgrades thast sometimes break existing apps make it impossible to check all the combinations.
We want you to be able to use the app and we want to help you if the app does not work as intended on your phone, so if you have any problem, use the contact email below for help. Do not use the Google Play feedback for that as there is no way to respond to individual feedback posts.
Please do not post a negative review until we have a chance to address any problem you may have.
Support questions, bug reports, feature requests and other communications about this app are handled exclusively via email through:
BusinessLog@eds-fl.com
Thank you for using BusinessLog!